Thursday, March 26, 2015

BLOOD SPLATTER COOKIES

How many times have you all heard me preach about doing things the easy way? Too many to count, right?

Well, here's another one of those times.... I just love simple ideas that really have a big WOW factor. Like these amazing Blood Splatter Cookies! They look devilishly delish, and couldn't be more simple to make!

Start out with your favorite sugar cookie recipe (fear not, if you don't have one, The Queen is always here to help) some homemade icing, and red food coloring. Or you could go even easier, and buy iced sugar cookies, and just add the blood splatter.... whatever works best for you.

If you don't have your own.... here's my favorite sugar cookie and icing recipes:

Sugar Cookie Ingredients (Recipe makes 2 dozen large cookies)      
1 cup butter (softened)                                                   

 
Cookie Directions
  1. In a medium bowl, cream together the butter and sugar. Stir in the eggs and vanilla. Sift together the flour and baking powder, stir into the creamed mixture alternately with the heavy cream. Cover dough, and chill for 2 to 3 hours, until firm.
  2. Preheat oven to 350 degrees. Grease cookie sheets.
  3. On a lightly floured surface, roll out the dough to 1/4 inch thickness. Cut into shapes with a round cookie cutter. Place cookies 1 inch apart on the prepared cookie sheets.
  4. Bake for 12 to 14 minutes in the preheated oven, until bottoms and edges of cookies are light brown. Remove from baking sheet and cool on wire racks.
Icing Ingredients (Recipe makes white icing for 2 dozen large cookies)   
2 cups confectioners' sugar                                             

Tuesday, March 24, 2015

A LITTLE HELP, PLEASE

I just received an e mail from one of our fellow Halloweenies, Amanda.... begging for a super-cute, and a little crazy headband idea, for her upcoming formal event.

She'll be wearing a black gown, and wanted something that would really stand out.

Well, I think this is exactly what you're looking for, Amanda.... let's revisit the ghosts of blog posts past, shall we?......

MAKE A BATTY HEADBAND!

Oh, how cute is this???? I loooooooove it! I came across this little gem while surfing the web, and I gotta tell you, there are so many talented crafters out there!

I couldn't find the instructions....but I would say from all my years of crafting experience, all you'll need is some black floral wire, black foam sheets (or black adhesive paper) scissors, maybe a glue stick or hot glue gun.... and a plain black headband.

From the picture, it looks pretty simple. If I had to guess, I'd say.... make a bat template, trace it, cut it out, attach the bats (by hot glue or glue stick) to the wire, (cut at different lengths, and be sure to add a few extra inches at the bottom for twisting around the actual headband) Use the photo as a reference how far apart to set them, and I say add as many bats as you like.... until you get the desired look that you're going for!

Pretty simple. And the best part.... it doesn't have to look exactly like the picture. If it's not perfect, you're the only one who knows. I also think this would be great if you were going as Melanie from "The Birds", with a flock of killer birds flying around your head....

Friday, March 20, 2015

HAPPY FIRST DAY OF SPRING!

And on a Friday, to boot! How great is that?

I hear that some of you are still shoveling (eeeeccchhhhh) snow, in your part of the world.

Hopefully things will warm up soon, and you can enjoy that spring weather!

Well, if you're not sure what to do to celebrate spring's arrival.... It's still not too late to hop online, and buy some plants and seeds for the garden!

Here's one of my favorite places to shop, check out the Park Seed website! You'll find everything you'll need for your garden.... and it'll get you in the mood to go out and play in the dirt! (and according to their website... they're offering FREE SHIPPING on every order! TODAY ONLY!)

Happy Friday, Halloweenies!

Thursday, March 19, 2015

SO WHAT DO WE DO WITH ALL THOSE JARS WE'VE BEEN SAVING?

I got an e mail from a new Halloweenie, Katie.... and Katie says she's seen me post about saving jars for projects.... but hasn't really seen too many, lately. Sorry about that, Katie.
 
And if you're like me and Katie, you've been saving those glass jars (and lids) for months and months for future projects, like candle holders and specimen jars..... you'll like this, it's one of my favorites. I loooooove this project! I think this is such a cute idea, and super easy for the kids to do, too!

Take some of those jars and lids, and add a few sticks, some moss, spray paint, and some fake birds or creepy crawlies. Secure with a few dabs of hot glue, and I would even spray a light coat of black or white spray paint over it, to make it look older and creepier!

The possibilities are endless!
 
And be sure to keep saving those jars! Happy Thursday!
 

Monday, March 16, 2015

GARDEN PREP

Oh, how I love this time of year! It's time to prep the gardens, and I spent most of the weekend getting things cleaned out, and ready to plant. It sure was nice to get my hands dirty

I'm adding a few new blooms this year.... I just got the seeds, so I'm excited to see how they turn out this spring.

In addition to my standard black cat petunias, I've also decided to add some black pennies and black pansies to the gardens. I have a lovely old black cauldron that I think the pennies would look great in.

Hopefully, things will warm up and thaw out in your part of the world, so you can get your hands dirty too! You just may want to fly around the www and start looking for seeds and plants.

Remember, it's not too early to start planning.... a few black night tulips here.... a few black roses there....

I do believe it's going to be a boo-tiful garden. Happy Monday, Halloweenies!


Friday, March 13, 2015

HAPPY FRIDAY THE 13TH.... AGAIN!

How lucky is it that we have another Friday the 13th, this year? I hope that you all have a frightfully fantastic day!


          Come on.... that's funny!

Thursday, March 12, 2015

IT'S ANOTHER PROJECT DAY!

I found this picture floating around facebook, and I thought it was such a neat idea, I just had to share it! What a great way to re-use all those wine bottles we've got laying around (you don't? well, here at The Manor we have quite a bunch!)

These candles look so pretty grouped together, and it's a great idea to have for outside, since the wind won't blow them out.... genius!

If you know someone who has a glass/bottle cutter.... you may need to call on them for some help. If not... here are a few tricks on cutting bottles, that you may want to give a try.

All we need to do now, is find some chunky candles, and empty a few bottles of wine! Sounds like a good day to me....

Wednesday, March 11, 2015

Monday, March 9, 2015

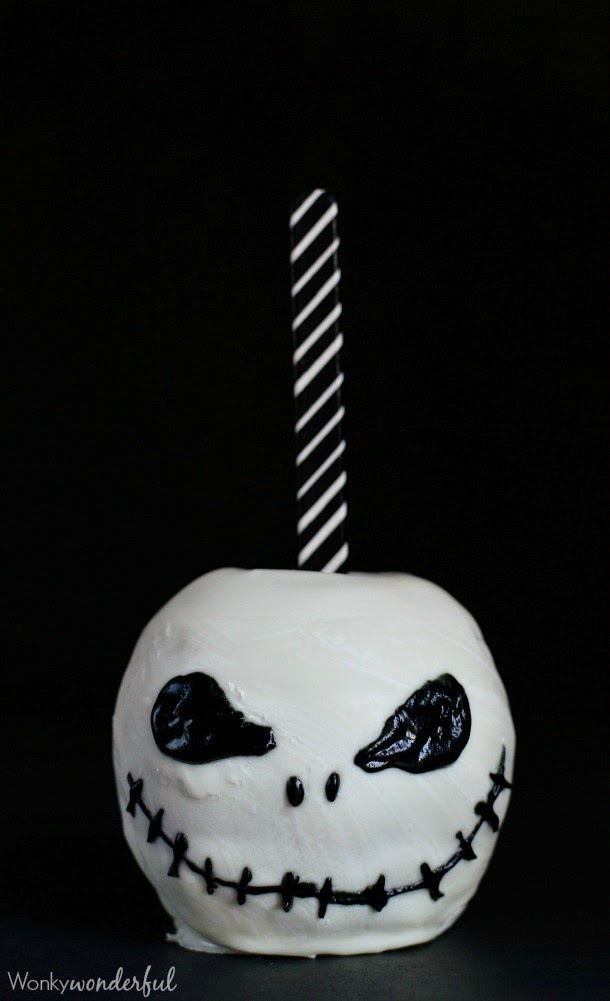
JACK SKELLINGTON CHOCOLATE COVERED APPLES

Boys and girls of every age,
Wouldn't you like to see something strange?
Come with us and you will see,

Something fun for you to eat......
What?! Jack Skellington Chocolate Covered Apples! How cool is this? They're an easy and impressive treat, anytime of year, if you ask me! 

These are a great alternative to plain candy apples.  Especially for anyone who's a real The Nightmare Before Christmas fan!

This amazingly simple recipe comes from those crafty wizards at Wonkywonderful.com! (click on the link to see the actual step-by-step photos)

Here's what you'll need....

Ingredients
4 Apples
2 Cups White Chocolate Morsels
1 Tablespoon Coconut Oil
Black Icing
4 Popsicle Sticks
Black & White Washi Tape (optional)
 
Instructions
  1. Cover popsicle sticks with washi tape.
  2. Wash and dry apples. Remove stems and insert sticks.
  3. Melt white chocolate and coconut oil in microwave. Stir every 20-30 seconds. Heat until smooth.(You’ll want to use a dish or cup that is not much wider than your apples and deep enough to fully submerge the apple.)
  4. Let melted chocolate cool for 2-3 minutes.
  5. Dip and allow the excess to drip off.
  6. Transfer to plate covered with wax paper. Immediately transfer apples to refrigerator. (To prevent chocolate puddles at base, spin apples after refrigerating for 2-3 minutes. This will remove the excess chocolate at bottom.)
  7. Once chocolate has fully cooled (5-10 minutes) dip in melted chocolate one more time, repeating process.
  8. After second chocolate coating has fully cooled, begin painting the Jack Skellington face.
  9. Use a fine tip brush for painting.
 
*Chocolate Covered Apples are a messy treat. The chocolate will break apart while eating. You have been warned*
 
For more really great recipe ideas, be sure to check out Wonkywonderful.com!
 

Tuesday, March 3, 2015

NOW THAT'S USING YOUR HEAD!

I feel the need to spray paint something today.

As I was flying around on Pinterest this morning, I saw some cute ideas for decorating with skulls. What fun! How could you not want to decorate with skulls?

I love these super shiny metallic skulls. And let me tell you.... I've seen them in all sorts of decorating catalogs for lots (and lots!) of money. But who wants to spend that kind of cash on something you could make, that would look just like that (or pretty darn close) anyway?

So, you'll need to root through your crafty closet and find some skulls. Any kind would work.... plastic, styrofoam, ceramic..... you get the idea.

The grab some gloss metallic gold (or silver would look great, too!) spray paint. Lay out a few newspapers (in a well ventilated area, or course!) and give those skulls a few thin (even) coats of paint.

Let dry according to the instructions on the paint, and now you've got some very cool décor for
any room in the house.

 
If you like these book ends, they're really not too difficult to make yourself. No, really!

You could get 2 wooden bases similar to the picture (make sure the skulls will fit nicely on them) coat them with primer.

Let dry, then give them another coat of glossy black paint. Let dry again. Then attach the skulls with a good adhesive.

To make it extra shiny, I'd spray a clear gloss enamel coat over the whole thing, and let dry for a few hours.

Pretty darn cool, am I right?

And we didn't spend any money, did we? Even better!

So grab some skulls and some spray paint, and have yourself a crafty Tuesday!