Thursday, June 28, 2012

PUMPKIN VOTIVES

If the thought of frightful jack-o'-lanterns gives you the chills, opt for a lovely and luminous group of votive holders instead. These gently glowing lights, cut from pumpkins in pale hues, are easy to make: Simply slice off the tops, and scoop off the flesh. Set on glass votive holder and candle inside each, and arrange a few small, uncarved pumpkins alongside. (But remember: Keep an eye on the lighted candles, and be sure to blow them out at the end of the evening)

To make pumpkin votives with miniature pumpkins (pictured below), you will need miniature pumpkins, votives, floral cutters, and a hand-drill fitted with a 1 1/2-inch-wide paddle bit. If possible, get a second person to help: He or she can don a pair of work gloves and hold the pumpkin in place as you drill.


1. Using floral cutters, trim the stem from the pumpkin.
2. Center the paddle bit over the pumpkin, and drill about 1/2 inch deep.
3. Insert votive. The pumpkin can be stored in a cool, dry spot for up to one day.

For more sophisticated decorating ideas, check out Martha Stewart.com!

Wednesday, June 27, 2012

HOST A PUMPKIN CARVING PARTY

I think one of the things that I've always loved so much about the Halloween season was that special time of year.... falling leaves, cooler weather and the Harvest Festivals! Growing up in the hills of central Pennsylvania, we really had the best Fall seasons... ever! (And trust me, there's nothing better than the smell of burning leaves and warm cider)

Every year we'd have a big hayride and go pick out pumpkins, then go back home and have a good old fashioned Pumpkin Carving Party!

It sure sounds like a good way to kick-off the Halloween party season. Here's a few tips to have the best Pumpkin Carving Party ever!

Pumpkins! Have a supply on hand for your guests, or plan to head out to the local pumpkin patch to get 'em. And if you've got little ones who may not be ready to do any carving, be sure to get some mini pumpkins and lots of craft paint! Have a special designated area for little ones who will want to paint their pumpkins.

Decorations~ Think Harvest time. Hay bales, leaves and corn stalks. Cover tables with brown craft paper (for tables that you'll be using for eating, carving and painting) and throw up a few white (or orange) twinkle lights and I think you'll love the festive mood!

Menu~ Grill hot dogs, make deviled eggs, cheese fondue dip, and don't forget the staples of any Harvest festival.... apples and pumpkins! Apple cider, apple crumbcake, pumpkin cupcakes even carmel apples! And a guarenteed party favorite... be sure to roast some pumpkin seeds!

Now that I've given you the ideas, don't forget to send out party invitations. And if you log on to Familycrafts.com you can print them off yourself.

Happy Party Planning!

Tuesday, June 26, 2012

HOLY PUMPKIN POPTARTS!

Keeping with my "pumpkin theme" this week... who doesn't love pumpkin pie? But it takes so long to make from scratch, and the storebought versions just don’t do it justice. Thank goodness for poptarts! Inspired by their speedy, must-have-pie-now format, the amazing Brooke Mclay from the Family Kitchen website conjured a cookie sheet full of palm-sized pumpkin pies in less than 20 minutes! I know, I told you she was amazing!

Half the fun of these pumpkin poptarts, of course, is carving your own designs into the top crust before placing it over the filling. Brooke used a small paring knife to do the carving, and found that a prepared pie crust pulled straight out of a cold fridge made carving a super simple task. If your kids are too young to do the carving themselves, invite them to draw a face into their pumpkins with a toothpick before you carve out their artsy, Halloween creations. Then sprinkle your poptarts with sugar before baking, but the poptarts are equally delicious when glazed fresh out of the oven. Here's Brooke's recipe:

Ingredients:
1 cup pumpkin puree
1/4 cup sugar
1 egg
1 package refrigerated pie crust

Glaze:
1 cup powdered sugar
2 tablespoon milk
1 tablespoon light corn syrup
1/2 teaspoon vanilla

Instructions:
In a large bowl, mix together pumpkin puree, sugar, and egg.
Unroll pie crusts, cut the edges off to make a large square, then cut the pie crust into three equal rectangles (about 2″ x 3″).
Spoon a small amount of pumpkin mixture into the center of one of the rectangles, taking care to not let the filling ooze near the edges.
Use a small paring knife to carve jack-o-lantern faces into a second rectangle.
Gently lay the carved piece over the pumpkin filling, then press the edges firmly together with a fork.
Transfer to a cookie sheet and bake in an oven preheated to 400 degrees for 8-10 minutes, or just until the edges of the poptart begin to turn golden brown.
In a large bowl, mix together the powdered sugar, milk, corn syrup, and vanilla.
Drizzle glaze over hot pumpkin poptarts.
Allow to cool on a cooling rack before serving.

And for more fantastic, family fun with food.... check out The Family Kitchen!

Monday, June 25, 2012

FOR THE LOVE OF PUMPKINS!


All you faithfull followers know how much I adore pumpkins! (I've loved 'em since I was a kid!) And as much as I love those plump, little cuties..... I also love paint! So here's another project idea....

Painting gourds has been a folk art favourite for centuries, so I'm not sure that this really qualifies as innovative, but it sure is fun and easy! Here are some fab-u-lous ideas from our friends at HGTV.

For the elegant Halloween, white pumpkins and soft pastel/shabby chic pumpkins have been all the range for several years now. As for the spooky version, do a little graphic black and white treatment..... a cat, spider, moon, (etc.) stencil will always do the trick. (Soooooooo easy!)

Oh, not much of a painter? You can always dust it with sparkles! (Never a bad idea.)

Friday, June 22, 2012

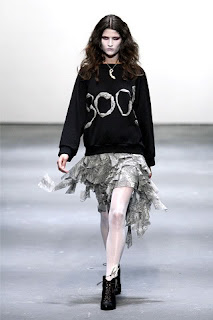
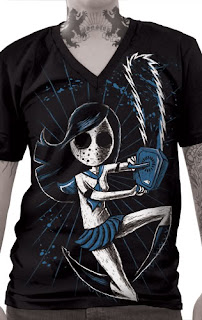
HALLOWEEN FASHIONS TO WEAR ALL YEAR LONG!

One of  the cool things about fashion is that much like art, it's a way to express yourself. So why not combine the two, and wear some fashionable art all year long?

Now here are a few tees that would surely get some attention if you wore them to dinner with the in-laws or to the kids school play. But for the true Halloweenie, it's just another day to show the world your true "spirit"! As a matter of fact, tee shirts are so cool... they've even made it to the  fashion runway!

But if you're just looking for some design ideas, maybe these will inspire you to make your own!

Check out the Akumu Ink site for more cool shirts and purchase information!

Thursday, June 21, 2012

BLOODY NECKLACE

I'm always looking for interesting jewelry with a twisted Halloween theme....and this one fits the bill perfectly!

This bloody necklace would be the perfect piece for your ode to Marie Antoinette or whoever you want to be for Halloween.

This particular bauble comes from Weirdly Cute.... and I do agree, it's pretty darn cute. Now if you like to make jewelry, I'm sure with some clear jewelry wire and some red beads, you could pull off the same effect.

You could make necklaces, bracelets, anklets.... the possibilities are bloody endless!!!!

Wednesday, June 20, 2012

GUMDROP PUMPKIN

How cute is this? I just love those crafty folks at Craft Elf! This idea is great if you're looking for a sweet treat centerpiece for the family Halloween party. Or maybe you know you'll be the homeroom mom who has to come up with a fabulous treat for the classroom party...crafting a pumpkin from orange slice gumdrops, toothpicks and a Styrofoam ball is a great way to keep the kids entertained.... and results in a beautiful centerpiece you'll just want to eat up!

Directions:

1.Flatten the bottom of the Styrofoam ball by pressing it down on a flat surface.

2.Cover the Styrofoam with foil.

3.Cut a toothpick in half. Insert the cut end of the toothpick into the flat side of an orange slice gumdrop about 1/4" from one end.

4.With the foil covered Styrofoam ball flat on your table, place the pointed end of the toothpick into the Styrofoam so that the bottom of the orange slice is even with the bottom of the Styrofoam ball.

5.Continue adding orange slices as you did in steps 3 and 4 until you have a row all around the bottom of the Styrofoam ball. You should place the orange slices close together so that you do not see the foil. It's ok if a little shows through.

6.Once your first row of gumdrops is complete, start a second row above the first row. These gumdrops should slightly overlap the row below.

7.Create a third row above the second row with the gumdrops overlapping the previous row.

8.Once you have made three rows, there will still be an unfinished area on the top. To cover this area, cut one orange slice in half lengthwise. Lay it down flat on the top center with the two straight edges touching. It should form a circle. You do not need to secure this piece with toothpicks as it will be secured by the leaves.

9.The last row will be made with half gumdrops and will be place between the third row and the one you placed flat on top. Cut six gumdrops in half crosswise (across in the shorter direction)

10.Insert a cut toothpick into one of the cut gumdrop pieces along the flat edge.

11.Stick the other end of the toothpick into the Styrofoam so that the cut edge is facing the third row of gumdrops and the narrow end is slightly overlapping the flattened center gumdrop.

12.Continue around until the foil covered ball is covered in gumdrops. You many not need all the gumdrop pieces you cut or you may need more depending on your spacing.

13.Place one full toothpick into the end of each of the two spearmint leaf gumdrops (green gumdrops).

14.Insert the other end of each of these toothpicks into the top of the completed pumpkin going straight through the flattened top gumdrop.

Approximate finished size is 5 1/2" tall.

For more super kid-friendly craft projects, check out Craft Elf!

Tuesday, June 19, 2012

CREATIVE HOMEMADE COSTUMES!

You know, there are so many great Halloween costume ideas, but I really think that it takes a special person to design and make their own costume!

(I for one, have always promised myself I'd make the famous Lily Munster dress, but have never managed to do it...)

So,if you're thinking of going all out this year, and are up to the challenge.... why not make your costume? If you need some inspiration, just check out these folks and their awesome get-ups! And if you're stuck for ideas, just hop on the old Internet and search for "homemade Halloween costumes" and you'll get lots of inspiration!

Here's a few to get you started....

Monday, June 18, 2012

MAKE A MINI PUMPKIN GARDEN

You all know how much I loooooove pumpkins.... and there are so many reasons why. And this one is fabulous, what a great idea! And I'm so mad I didn't think of it.


This comes from Yellow Pelow, and it truly is amazing. I think with a little patience, follow the directions carefully, add a little creativity, and I think you too could pull this off.

I think I found a new project this weekend....

Thursday, June 14, 2012

BLACK AND WHITE TABLESCAPES

Sometimes it takes months of planning to pull off the perfect Halloween party. But if you've decided this year to do something a bit more sophisticated, like an All Hallows Eve dinner party, why not try a black and white theme?

It's really a lot easier than you think. Black and white invitations, subtle decorations, even cocktails... and don't forget the perfect costume!

And when it comes to dinner, check out some of these spooky & elegant table settings.... and remember, sometimes all you need is some black and white spray paint, glitter, maybe a few cobwebs, and you can transform anything!


WHAT'S UP CUPCAKE?

Can a cupcake be both tasty AND naughty? YES!!! If it's the Chocolate Chipotle cupcake filled with lime pudding and topped with lime cream cheese frosting! AND here's another surprise.... it's a VEGAN recipe!!! Now, don't turn your nose up.....it's fantastic! You know I wouldn't lie to you.

Come on, try it, you'll like it.....

Chocolate Chipotle Cupcake:
1 cup soy milk
1 teaspoon apple cider vinegar
3/4 cup granulated sugar
1/3 cup canola oil
1 1/2 teaspoon vanilla extract
1 cup all-purpose flour
1/3 cup cocoa powder, Dutch processed
3/4 teaspoon baking soda
1/2 teaspoon baking powder
1/4 teaspoon salt
3 chipotle peppers, seeded and minced (I used chipotles in adobo sauce)

Directions:
1. Preheat oven to 350 degrees and line muffin pan with paper or foil liners.
2. Whisk together soy milk and vinegar in a large bowl, and set aside for a few minutes to curdle. Add the sugar, oil, vanilla extract to the soy milk mixture and beat till foamy. Stir in chipotle peppers. In a separate bowl, sift together the flour, cocoa powder, baking soda, baking powder, and salt. Add in two batches to wet ingredients and beat till no large lumps remain.
3. Pour into liners, filling three quarters of the way. Bake 18 to 20 minutes, until a toothpick inserted into the center comes out clean. Transfer to cooling rack and let cool completely.

Lime Pudding Filling:
1 pkg Mori-Nu silken firm tofu
8 oz soy cream cheese
1/2 cup persian lime juice
2 teaspoon grated lime zest
2 pkgs Mori-Nu Mates vanilla pudding mix
1 tablespoon liquid sweetener (I used maple syrup)

Drain water from the tofu. In a food processor blend tofu and lime juice until creamy and smooth - about a minute or so. Add the rest of the ingredients, and blend again until smooth - for about 3 minutes. Allow to chill 2-3 hours or until firm.

Lime Cream Cheese Frosting:
8 tablespoons margarine, softened
8 ounces Tofutti Cream Cheese
2 tablespoons lime juice
1 teaspoon lime zest
4 to 5 cups confectioners sugar

Cream together butter, cream cheese, lime juice and zest with an electric mixer. Add 4 cups confectioners sugar one cup at a time and continue beating. If frosting is too thin add more confectioners sugar, one tablespoon at a time until proper consistency is reached.

Wednesday, June 13, 2012

Portia de Rossi cast in NBC’s Munsters reboot ‘Mockingbird Lane’ as Lily Munster

Daniel S Levine 6/13/2012

Portia de Rossi is joining the cast of NBC’s Mockingbird Lane, a reboot of the classic 1960s series The Munsters. The former Arrested Development and Better off Ted star has been cast as Lily Munster, Herman Munster’s wife.

The platinum blonde de Rossi was cast to play the brunette character on Tuesday, reports Deadline. Lily is a vampire who is married to the family patriarch, Herman, who will be played by Jerry O’Connell.

According to Entertainment Weekly, the pilot is already in production and could air as soon as mid-season. Pushing Daisies creator Bryan Fuller is developing the series, which will take a darker, more dramatic tone than the original series.

“The script is such a dramatic departure from the tone and style of the original show. If we continued to call the show The Munsters, people are just going to to think we’re doing The Munsters,” he told EW, explaining the title change. “We’re doing a reinvention and re-imagination of this property.”

O’Connell was cast last week to play Herman. He and de Rossi join Mason Cook, who will play Eddie Munster, and Eddie Izzard, who will play Grandpa. Charity Wakefield has also been cast to play the family’s ‘normal’ cousin.

NBC had originally tried to get True Blood actress Mariana Klaveno for Lily Munster, but she was already committed to ABC Studios and Marc Cherry’s Devious Maids. Although ABC passed on the show, Lifetime has shown interest in the project, so ABC refused to let Klaveno go.

The Mockingbird Lane pilot is set to be directed by Superman Returns director Bryan Singer.

FLOWER POWER

That Martha Stewart sure is a crafty one. And I have to admit, when it comes to creative Halloween decorations, no one does it better....

Dreadfully sophisticated and shockingly fun, this bouquet infested with insects gets Halloween off to a screaming start!

I'm a firm believer in use-what-you-have decorating, and this is a great example. We all have a bunch of silk flowers lying around somewhere, don't we? (You don't??? Oh, maybe it's just me) Use your trusty hot glue gun to add a few of the kid's rubber snakes and spiders... get an old vase (spray paint it black) and make a spookified flower arrangement!

This would be a great centerpiece on the dining room table, mantel or end table.

Check out more fantastically-frightful decorating ideas from Martha Stewart!

Tuesday, June 12, 2012

HALLOWEEN HAIRSTYLES

Part of having a great Halloween costume is also having a really fantastic hair-do to go along with it! It can really pull your whole outfit together...... and sometimes the crazier, the better!

Now some of these ideas may require some help from your favorite salon, and could be a bit pricey. So keep in mind that if you have a beauty school in your area, a lot of times, you can have students work on your hair, and it's half the price....so be sure to look into it.

Monday, June 11, 2012

FRIENDS 'TIL THE END!

Well, with the Zombie Apocalypse coming sometime in the near future..... this would make a great gift for your BFF!

Hilarious!

Friday, June 8, 2012

LET 'EM EAT (more) CAKE!

I always think a fantastic cake makes such a great party centerpiece. It can set the tone of the party, is cool to look at....and your guests think you're a totally amazing hostess!

Now, if you're not an expert baker (which...or witch...I am not) you can still pull off the same effect of this 3 layer cake by getting it pre-made from your local bakery (with the orange and black icing already on it) and adding some decorative touches and gingerbread. Now don't panic, it's really pretty simple.

Once you get the cake home, use some pre-made gel or icing to add decorations (you might want to pratice by making a few doodles on some paper before you try it with the icing) like swirls, bats, blood splatter or cobwebs (and don't worry, they don't have to be perfect) on the bottom layer.

Then using back icing or gel, make a "fence" on the second layer the whole way around the cake. (just use the picture as a reference) Ok, now that most of the cake is done, you can work on the haunted house.

Get a package of pre-made gingerbread dough, lay it out flat, and using a template (there are so many you can find on the internet.... print it out, then trace it on cardboard and cut it out. simple) that you've made from cardboard, cut around the edges from the outline of the house in the dough. Also be sure to cut out a few windows and any other elements you like for your house. Bake according to package instructions.

Once it's cooled, decorate by spreading black icing over the entire house. Use a tube of pre-made white icing to outline around the door or windows, if you like. (you don't have to, it's just an idea)

To make the house stand up on the top of the cake: attach 2 wood dowels with icing onto the back of the cookie, using more icing on the bottom of the dowels push gently into the top layer of the cake, until it stands sturdy.

And if you're really ambitious, make and decorate a bunch of tiny tombstone-cookies to line around the bottom layer of the cake, (stick on with a glob or icing on the back of the tombstone-cookie) or use the cupcake idea.

I know, it sounds like a lot of work, but if you take a few shortcuts (like buying the cake and pre-made gingerbread dough) you'll be amazed at how talented you really are.

And the best part....your guests will think not only are you an amazing party hostess... but a top-notch baker to boo-t!

Thursday, June 7, 2012

CHOCOLATE ZOMBIE HEADS!

WOW! Now these are my kind of bon bons! Wouldn't this be the perfect box of candy to get on Valentine's day?

Or, just to freak out the kids.... and scare off those unwanted dinner guests! Serve up these little cuties on a silver platter, and the shrieks and screams will soon follow!

For more information, log on to Geek Alerts!

Wednesday, June 6, 2012


Who doesn't love a good theme party??? Am I right?

There are so many ideas and so many creative people who've come up with great party themes! It's all in the planning! Planning the props, decorations and the menu. Give 'em a theme...and the cool, crazy and creative costumes will follow!

And remember.... theme parties are great for anytime of the year... not just Halloween! Click on the links below to check out some of these amazing ideas from all over the web......

1. Ghoulish Glam Halloween party

2. 80′s style prom

3. Mad Scientist themed Halloween party

4. Hero’s & Villain’s

Tuesday, June 5, 2012

SIGN, SIGN, EVERYWHERE A SIGN

It seems that for some reason "signs" have become a decorating staple. And you know, come to think of it.... I've crafted quite a few signs in my time. I too, love signs!

And Halloween is noooooo exception! The best part about making signs is that you can make them as elaborate or as rustic as you like.

Here's some inspiration to get you started, but I caution you....once you start collecting (or making) signs, it's kinda hard to stop. You've been warned.....