If you're planning a Halloween party for the kids you know that keeping them entertained can require you to have a spell book full of magic tricks. Well, let me tell you, games are always a great way to keep them from getting bored.
Here is the best collection of Halloween party games (for grade school aged kids, anyway...) on or off the Internet. (Pretty easy and not too expensive!)
These party games are kid-tested, and you can use these Halloween party games for other events, too. Use your imagination, and just have fun! Check these out.....
For prizes, I suggest penny candy and party favors (Like you'd find in bulk at the Party Supply stores), so you can give out lots of prizes. Try to make sure every kid wins a few pieces. After all, the object is to have fun, not compete against one another.
The "Name Game"
This is a warm-up, get to know you game for kids through adults.
All you need is:
3x 5 cards
Marking Pen(medium or wide point)
Safety Pins
Before the party, print neatly the name of a person or character associated with Halloween onto a 3x5 card.
Use a different name on each card.
Make up enough cards for more than each person invited to the party, especially for kids. This can be such a fun game, that party participants often want to play it more than once.
Upon arriving, use a safety pin to put one card on each guests' back. Do not tell them who is on the card.
Game Objective: To guess who "you" are, the name on your back.
Rules:
You can ask only one question of a guest, before moving to another guest to ask a question.
Only "Yes" and "No" answers can be given.
Laughing, facial expressions, etc are certainly allowed.
Look for questions which will quickly narrow the quest such as:
Am I a male(or female)?
Am I a real person(versus fictional character)?
If a guest guesses too quickly, give them another name tag.
Ghost-Centration:
Object of Game: To guess pairs of hidden objects. Like the "Concentration " game.
Preparation:
Take twelve post-it notes.
Using a crayon or marker, number each post -it note from one to twelve on the front, non-sticky side.
On the other side, put on two cards each the words: Ghost, Pumpkin, Witches, Goblins, Treats and scarecrows. Make sure each pair not in numerical order.
You can make up any pairs of names you want.
Put the post-its on a wall in two or three rows in numerical order.
Playing the Game:
Each player takes a turn asking for two numbers to be turned over.
If there is a match, the player wins a piece of candy.
The play goes on to the next player whether or not a match is made.
Tip: For older "kids", use more than twelve post-it notes.
Pumpkin Golf:
Object of Game: Hit the golf ball into a pumpkin.
Preparation:
Carve out a pumpkin. Make the mouth extra large.
Build a cardboard ramp about one to two feet side from the ground to the bottom of the pumpkin's mouth.
You will probably need some support under the cardboard.
Tape the ramp to the floor for stability.
Mark a starting point a few feet from the start of the ramp. The older the kids, the farther away.
Playing the Game:
Each player gets to hit a golf ball three times.
Each time the ball goes into the pumpkin, the player wins a piece of candy.
Pumpkin Bowling:
Object of Game: Knock over the bowling pins. Make a strike or a spare.
Preparation:
Select several small pumpkins about four to six inches in diameter. You need extras in case a few split or break.
Place plastic (children's set) of bowling pins several feet away on the lawn or floor of the room.
A great alternative to bowling pins are plastic liter bottles. Let the kids decorate them with Halloween objects before the game.
Playing the Game:
Measure off several feet.
Give each child two tries to knock down the pins.
A strike is worth two pieces of candy.
A spare is worth one piece of candy.
Pumpkin Penny Pitch:
Object of Game: To pitch a penny into a pumpkin.
Preparation:
Method #1: Carve out a pumpkin (or two,or three) and line the inside with plastic or aluminum foil.
Make the top opening big.
Method: #2: Use several small plastic pumpkins(Less messy)
Playing the Game:
Place the pumpkins a couple feet away.
Give each player ten to twenty pennies.
Every time a penny goes into the pumpkin, a piece of candy is won.
Pumpkin Ring Toss:
Object of Game: To toss a ring around a pumpkin.
Preparation:
Carve out a one to three pumpkins.
Buy or make three or four rings about twice as big around as the pumpkins.
If you don't know what to use, try an extra piece of leftover electrical cable and tape together with duct tape. (Scouts use this as a "Reduce, re-use and re-cycle" project)
Playing the Game:
Measure back several feet, depending on age group.
Give the rings to the player.
A piece of candy (or two) is awarded for ringing the pumpkin.
You can award one piece of candy for a partial ring and two if the ring is completely around.
Tic-Tac Ghost:
Object of Game: Get three O's or X's.
Preparation:
Use a "Toss Across"game.
Tape pieces of candy or small prizes on some of the O's and X's.
You can use a paper note stating the prize. Sometimes the prizes are too big to put on the game.
Playing the Game:
Each player gets five or six bean bags.
Toss the bean bags at the game. There are two ways to win.
Win a prize by getting three O's or X's.
If the player turns over a prize, they win that prize.
Monday, August 20, 2012
Wednesday, August 8, 2012
HALLOWEEN MAKE-UP
I've never been a fan of "masks", they get too hot, are to difficult to talk and eat with, when you're in full party mode...and besides.... when I show up at a party, I want everyone to know it's me.... I'm not mush of a mystery woman. So that being said.... if you think like I do, Halloween make-up is the way to go!
It's fun to practice and the results can be drop dead gorgeous! (Or gory, depending on what appeals to you)
And no need to buy expensive Halloween make-up, you can find some really good (cheap) pencils, shadows and fake lashes and your local drug store.
You might want to sketch out a few ideas on paper first, if you have a specific idea in mind. I suggest using black and dark brown liner pencils, eye shadows and pick up some pale foundation, a few shades of blush and some wild lipstick colors. (And don't forget the make-up remover cloths, that's a must!)
So, if you're feeling a bit artistic today, why not try working some make-up magic?
Tuesday, August 7, 2012
MONSTER PIZZA
If I can give you any of my Halloweenie wisdom, I'd say.... use the "KISS" method. Keep It Simple, Silly. Those are great words to remember when it comes to party planning. Especially for kids.....
Think traditional Halloween colors, lots of great visual stimulation (decorations and funny props) and fun food! (Think finger food and even a candy station!) You know kids love to play with their food! So, make it extra fun for Halloween, try something "simple" like this scary, monster pizza.
Yes, pizza! Pizza is always great for a kids party....so easy to make (just add your own favorite veggie toppings) the kids can serve themselves, and clean up is so quick and easy! (And usually not too messy) You can make large ones or personal ones, even mini monster pizzas (perfect for little goblin hands) Be sure to make a pizza station on your decorated table, and watch the little monsters go bonkers! Here's a few ideas to inspire your pizza-creativity....
Monday, August 6, 2012
FREAKY FURNITURE FUN!
 I just love finding great things to decorate with for the old Manor, and the more macabre... the better! I actually have some shelves like this a master-crafter friend of mine made for me, and I love them!
 What a great idea! Not only is the furniture pretty and functional.... it's sooooo cool! I've already been looking around the Manor to do a bit of redecorating...... Check out Casket Furniture.com!
Friday, August 3, 2012
PROJECT GHOST
You can't have a haunted house without ghosts, right? Well around the Manor we've got lots of 'em, and you'll need them too!
Some ghosts are made from old sheets and ratty white fabric. but if you're in need of some ghosts who can stand up next to the punch bowl or to be used for a centerpiece, cheese cloth is the way to go!
This self-standing ghostly creature is actually pretty easy to create.... come on, it's time for another project.....
Here are the materials you'll need:
•Cheese cloth
•Scissors
•Fabric stiffener ("Stiffy" by Plaid works great)
•Small container
•Splat mat (Yes, it's gonna be messy!)
•Black felt for eyes and mouth
•Small terra cotta pot
•Styrofoam (1 to fit snugly inside the pot and 1 large for the head and 2 small for the arms.)
•Wood dowels
•Plastic wrap
Instructions:
1.Make a form for your ghost. If you need help with the shape, use the picture as a reference, but you can come up with your own idea too. Insert the large Styrofoam ball into the pot. Insert the dowel into the Styrofoam and add the head to the top. Insert dowels into the Styrofoam for the arms. Wrap plastic wrap around the Styrofoam so that the cheesecloth won’t stick.
2.Cut a piece of cheesecloth making sure it is big enough to drape over the form.
3.Set the pot on the mat in a place where you can leave it over night.
4.Saturate the cloth with fabric stiffener and drape over your form. Mold it and shape it the way you like it. Let dry.
5.Once dry pull out the form and cut round eyes and a mouth. Glue it to your ghost.
Pretty simple, right? If you'd like to see step by step instructions, check out the video on FaveCrafts.com!
It's just that easy! BOO-tiful!
Thursday, August 2, 2012
'Paranormal Activity 4' trailer: They're baaaaaaack!
by Erin Strecker
for Entertainment Weekly.com
You want to see something really scary?
The trailer for Paranormal Activity 4 has arrived, and as you might expect, it’s more of the same: shaky camera, creepy figure in the background, and a guarantee that something seriously disturbing is going to happen when you least expect it.
It’s no surprise that a fourth film is happening. After the incredible debut of the original dirt-cheap found-footage thriller, the second and third Paranormal movies combined to earn $383 million at the global box office. The fourth movie, starring Glee‘s Dianna Agron, will be released on Oct. 19, just in time for Halloween.
Click here to check out the trailer for the fourth installment!
Wednesday, August 1, 2012
BLOODY JAR CANDLES
 One of the fun things about doing this blog is finding other Halloweenies....like myself, who have some really amazing craft projects!
 A really good blog to check out for inspiration is Creepy Cupcakes! She's pretty darn crafty if I do say so myself. Check out one of her creepy creations.....
I have this weird hoarding habit when it comes to glass jars and bottles. I think it's because my dad find such cool uses for them that seem both homey and eclectic (like storing and displaying grains in the kitchen, or holding tealights in for subdued outdoor lighting).
This comes in handy, though, when I sit down to craft because -- obviously -- I like lights in jars and I like to craft mood lighting.
Here's what you'll need:
~Old spaghetti jar (cleaned, of course -- I like Bertolli for their jars)
~Modge Podge (or other gluey sealer; come to think of it, white glue would probably work fine)
~Modge Podge (or other gluey sealer; come to think of it, white glue would probably work fine)
~A cheapy paint brush
~Red food coloring or dark red paint
~A tealight/small candle
I poured some of the modge podge into a disposable container and added quite a bit of food coloring (why? because I didn't have any red paint and the modge-podge ensured it would dry with an opaqueness that would look, well, a bit bloodier).
I painted a generous amount around the rim of the jar, then blew downward to start it spreading in natural curves down the jar. I added more food coloring and darked the rim, letting it glob in places to make for a gorier impression when it dried.
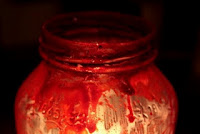
Then I flicked a little red modge podge with the paintbrush across and around the jar to make a splatter pattern. Just because I don't mind my fingers being stained, I also dipped them in the 'blood,' blotted them lightly, and then grabbed around the jar to make a handprint (for some reason, this refused to photograph properly).
Let dry and insert tealight and you have a bloody little lamp to set about at your party.
There you have it, straight from the Creepy Cupcake Queen herself! For more great ideas, check out Creepy Cupcakes!
Subscribe to:
Posts (Atom)


