Tuesday, August 2, 2011

MONSTER BROWNIES!

I have to tell you...I wish I could take credit for all these amazing ideas that I share with you all....but I CAN'T! I trudge through the world-wide-internet jungle to find the coolest Halloween stuff, I can....so I can show all of you! And one of my favorite sites is Amanda's Cookin'! She's amazing!

She has step-by-step instructions for these Monster Brownies, and she makes it look sooooo easy, you're gonna wanna try it! Take it away, Amanda......

I give you Brownie Monster Treats! Because decorating these treats can be time consuming, I chose to use a boxed brownie mix. You can certainly use your favorite recipe or do the same. I used three cereals: Trix, Cheerios and Cocoa Puffs. To make things easier on myself and to make this kid friendly, I also used Betty Crocker decorating cookie icing. Pretty cool stuff, Royal Icing in a bag! They sell all the colors I needed, but my rinky dink grocery store only had red, green and white, so I used some gel food coloring to get what I wanted. The icing from the bag dried much smoother, so I would definitely recommend buying the colors you want over mixing it yourself.

Here's something fun too. Because this is Royal icing, that means the frosting is dry (unless you use the gel like I did, that never dries LOL) so you can package them in cellophane gift baggies. While you are at it, be sure to make some bread tag monsters to close the treat bags with!


Here's what you'll need:
Boxed brownie mix
Betty Crocker Cookie Icing in desired colors
Cheerios, Cocoa Puffs, and Trix cereals
Mini chocolate chips
Pretzel sticks
Red and black decorator gel
1/4 cup powdered sugar
milk

First prepare your brownies and allow them to cool. I refrigerated mine so that I could get nice clean cuts. When your brownies are ready to be cut, cut off the edges and eat them :) (you could share too, just sayin') and cut the brownies into different sized rectangles and squares. I cut some of the odd shaped leftovers into triangles too.


Make the Eyes

It's important to do this step first to allow adequate time for the glaze to dry. To make the eyes you'll need any variety of Cheerios, some mini chocolate chips, powdered sugar and a little milk. Place the powdered sugar into a small bowl. Using a spoon, stir in some milk, a little bit at a time, until the consistency is good enough for dipping. Start with about a teaspoon and add a couple drops at a time until you get it where you want it.


Drop a few Cheerios into the glaze coating the cereal. Use a spoon to lift the cereal out of the glaze and place on a wax paper lined cookie sheet

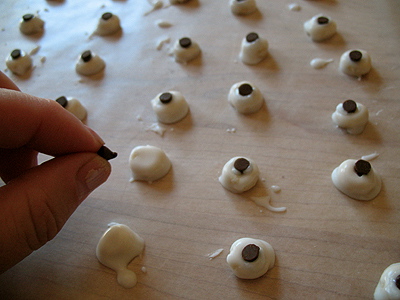
Place a mini chocolate chip, upside down, in the center of each glazed Cheerio. Gently press the mini chip to set. Set aside.


Icing Colors

You could certainly use your own recipe for Royal icing, I have one myself as well. However, because this is such a great recipe for kids to get involved in, using these prepackaged icings is an excellent alternative. They are available in all of the colors that I used by my store only had a few. Therefore, I added some gel food coloring to mix up my colors. This icing is great, squeezes right out of the tube and onto the brownie, love it!


If you have to mix, like I did, you might find the easiest way to apply the mixed icing is with a new paintbrush.


Decorating

Gently press Trix and Cocoa Puffs cereals into the frosted brownies for the monsters' polka dots. Lift the eyes from the waxed paper using a toothpick and gently press onto the frosted brownie. You can use pretzel sticks for arms and legs, and add eyebrows, mouths and hair using decorator gel.
 
Then you eat them!!!!!
 
Check out more great ideas from Amanda!
Monster Treat Bags
Bread Tag Monsters
Juice Box Monsters
Halloween Luminaries

Didn't I tell you she was amazing????!!!

Monday, August 1, 2011

KID STUFF

One of the best parts of Halloween is all the fun projects that you can do with the kiddos! And one of my favorites is working with paper mache..... I love it!

Making a Jack O-Lantern from a large orange pumpkin is the usual Halloween craft projects but perhaps you are having a hard time finding pumpkins....depending on where you live in the country. Or maybe you have a slight problem with "time management" and it's the night before the big bash!

Well, our fiends at Unique Craft have made it real easy, with step-by-step instructions for these paper mache Jack O-Lanterns!

What would you need is a large round balloons, paper and paper-mache (paper-mache) paste made by mixing one part flour and five parts water and boil mixture for about three minutes with a little salt to prevent mold. For the pumpkin stem was cut about an inch from the tip of the toilet roll core.

Blow up the balloon and tie with a long rope. Cut the paper into two inch strips and dipped into the paste. Cover the balloon with a piece of paper, build a good few layers to help keep the ‘pumpkin’ strong.

Hang to dry your craft to remember to put something below to catch any drips from the pasta. Once dry gently with a needle through the lantern balloon deflation. Toilet roll core can be attached to the lantern with pasta and more paper to make a rod.

With a sharp knife to cut eyes and mouth in a lantern. Children will have fun painting looks like a big orange pumpkin Jack O-Lantern. Stems in green paint. Your paper mache Jack O-Lantern is ready to light. Have fun with arts and crafts for children Halloween projects and happier ‘booing’.

For more great, crafty ideas, CLICK HERE!

Friday, July 22, 2011

100 DAYS TO GO!

The countdown is on....and it's 100 days until the Spookiest Day of The Year! And trust me, you can get a lot done in 100 days..... now would be a good time to start planning the kiddos costumes, buy fabrics, paints, and supplies.

Start checking out the websites and catalogs for props, decorations and costume ideas. I know that the "Back To School" shopping season is already upon us, but Halloween will be here before you know it!

Remember, the key to a successful spooky Halloween is all in the planning! Start thinking about party themes, menus and cool party invitations! And of course, I'll be here to help you every step of the way.....so don't put it off.

That would be scary.....

Monday, July 18, 2011

SPIDER CAKE

Halloween is one of the best occassions to have cake! I love it, and I love realy creative holiday cakes....and this one...well, it takes the cake!

Check out this cute little 8 legged creepy-crawly, and the cute cupcakes to match. I know this would be a big hit at the kiddos classroom party!

This cake design is done so beautifuly, but it doesn't look so complicated that you couldn't do a pretty darn good replica! Give it a try! And if you mess it up....eat the evidence!

For more amazing goodies...check out "The Twisted Sifter".....it's pretty awesome!

Wednesday, July 13, 2011

BLACK & WHITE PARTY IDEAS!

This is such a fun party idea, and you can get very creative.... go literal with the black and white party theme! Make it over the top with everything done in b&w including the decorations, the food, and even the cocktails!

Paying tribute to film and television before they contained color, you can add white or gray makeup to your skin to really look the part! Think Marilyn, Bogie,  and don't forget our favorite vampire, Bela Lugosi!

With a 40′s or 50′s costume in black, white, and shades of gray, you can be a Film Noir detective or bombshell in no time!


Thursday, July 7, 2011

IT'S SO CORNY

Well, how cool is it to combine two things that I looooooove, to make one really amazing piece of art? Check out this candy corn pumpkin!

Start by making your standard jack-o-lantern..... once he's been cleaned and carved, then it's time to decorate! You'll need your handy, dandy glue gun and a BIG bag of candy corn!

You're going to want to glue all the candy on the bottom end, with the "point" facing up. Then stick the candies on the pumpkin, in a side by side pattern. Remember to be extra careful with the hot glue! (This might be an ok project for older kids, but not good for tiny, little kiddo-fingers!)

Be sure to add a tea light candle inside, or just set on a pretty cake stand! I know it's corny....but it's awful cute too! What a great centerpiece for any Halloween party!

Friday, July 1, 2011

THE RAVEN


It seems like someone has been reading my mind..... remember how excited I was several months ago, about the news that Johnny Depp was working on the film "Dark Shadows"? Well.....so far...nothing! I was soooooo disappointed, and was hoping for a delish-scary movie to look forward to.....

And as some of you know.....I am totally in love with John Cusack (and have been for years.....it's ok, the hubby knows...and agrees...he's a cool guy....)

Well, today the actor said he’s confirmed to play Edgar Allan Poe in a new film out this fall! The info comes from a tweet by the man of my dreams, which said “official- i will play edgar allan poe in fall-a-film called the raven, send any poe- gold – my way as i begin this journey into the abyss.”

Clarifications: keep in mind that this is totally separate from the Poe film that Sylvester Stallone (really?) has long wanted to do. It is also totally separate from the feature version of the recent short film The Raven, which Universal is developing. From previous reports, here’s all we know about The Raven:

 
The Raven is a fictionalized account of the final five “mysterious” days of Edgar Allan Poe’s life. Apparently the famous writer joins the hunt for a serial killer whose murders are inspired by his stories.

The real death of Poe was also mysterious. The writer was discovered on the streets of Baltimore in great distress and in need of “immediate assistance.” He was wearing someone else’s clothes and repeating the name “Reynolds”. He died shortly after in hospital, never able to explain what had happened.
How do I love thee? I will be counting down the days!